SAP Cloud Platform SDK for iOS Walk Through – Part 2
Development Environment Setup
The purpose of this document is to demonstrate how to use the SAP Cloud Platform SDK for iOS and integrate to the SAP Cloud Platform via Apple Swift. This is not supposed to be the end all be all of development resources. Therefore we will go over some specifics on the integration but will NOT focus on things like Xcode setup or making a cool looking UX for the application
Since the application will be written in SWIFT, Xcode on a Mac is required. Unfortunately, there is no way around this. Specifically the screenshots that will be shown are from from Xcode 8.0 running SWIFT 3.0.
Here is how the integration will work:
- SAP Cloud Platform is setup to allow access to its services. Our focus here will be on the Connections and Destinations (query an integrated ODATA endpoint ) services
- The SWIFT application will call the Connections service to establish a connection with HCPms
- The SWIFT application will call and query the integrated ODATA service and display the results
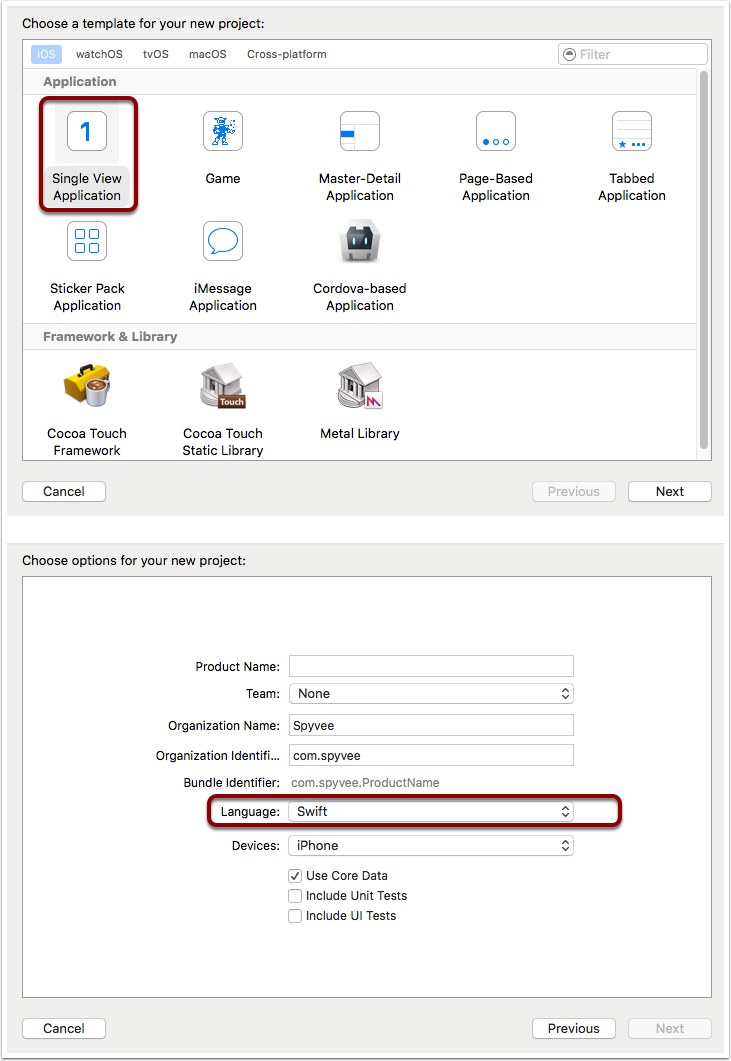
The first step is to create a new single view SWIFT project in Xcode.
Development Environment Setup – SWIFT Helper Modules
Unfortunately, the out of the box SWIFT tools to make HTTP Requests and JSON parsing are lacking. They are complicated and too low level for most use cases.
There are several free third party components you can use to simplfy the process
For HTTP Calls : Alamofire ( https://github.com/Alamofire/Alamofire )
For JSON Parsing : SwiftyJSON ( https://github.com/SwiftyJSON/SwiftyJSON )
Both of these can be installed via CocoaPods ( https://cocoapods.org )
During my setup, I had some issues with the CocoaPod installation. i believe that this had to do with the recent upgrade to Xcode 8. To help you out, here is the structure of my PODFile
source 'https://github.com/CocoaPods/Specs.git'
platform :ios, '10.0'
use_frameworks!target ‘HCPmsSimpleCall’ do
pod ‘Alamofire’, ‘~> 4.0’
pod ‘SwiftyJSON’
endpost_install do |installer|
installer.pods_project.targets.each do |target|
target.build_configurations.each do |config|
config.build_settings[‘SWIFT_VERSION’] = ‘3.0’
end
end
end
Development Environment Setup – SMP REST Services
The integration between the SWIFT application and SMP is done via REST-based web services. Interestingly, XML and JSON formats are available. We will be focused on the JSON structured versions of the services.
The communication process will be as follows:
- A request is made to SMP to establish a remote connection
- A request is made to the ODATA service controlled by SMP
Request to SMP to establish a registration connection
HTTP Method : POST
HTTP Headers : Content-Type = application/json
Accept = application/jsonX-SUP-APPCID = <SOMEUNIQUE_VALUE>
Body : {"DeviceType":"iPhone"}https://hcpms-trial.hanatrial.ondemand.com/odata/applications/latest/com.spyvee.demoCall/Connections
The Connections service creates registration between a device and HCPms. The X-SUP-APPCID is the unique value used to differentiate the different devices. That value will be utilized in all requests made to SMP
Request to SMP to connect to the ODATA service
HTTP Method : Get
HTTP Headers : Content-Type = application/json
Accept = application/json
X-SUP-APPCID = <SOMEUNIQUE_VALUE>https://hcpms-trial.hanatrial.ondemand.com/odata/applications/latest/com.spyvee.demoCall/Categories
This service provides access to query the integrated ODATA service. The query will return the list of Categories from the service
Its recommended that you test these services with a tool like Postman ( https://chrome.google.com/webstore/detail/postman/fhbjgbiflinjbdggehcddcbncdddomop?hl=en ). This tool allows you to query the web services and see the results. It might be needed to tweek the calls to fit your HCPms environment.
Swift Development – Complete Code
There are many online sites which will guide you through the usage of both Alamofire and SwiftyJSON. There is nothing special required to use them to access the HCPms services.
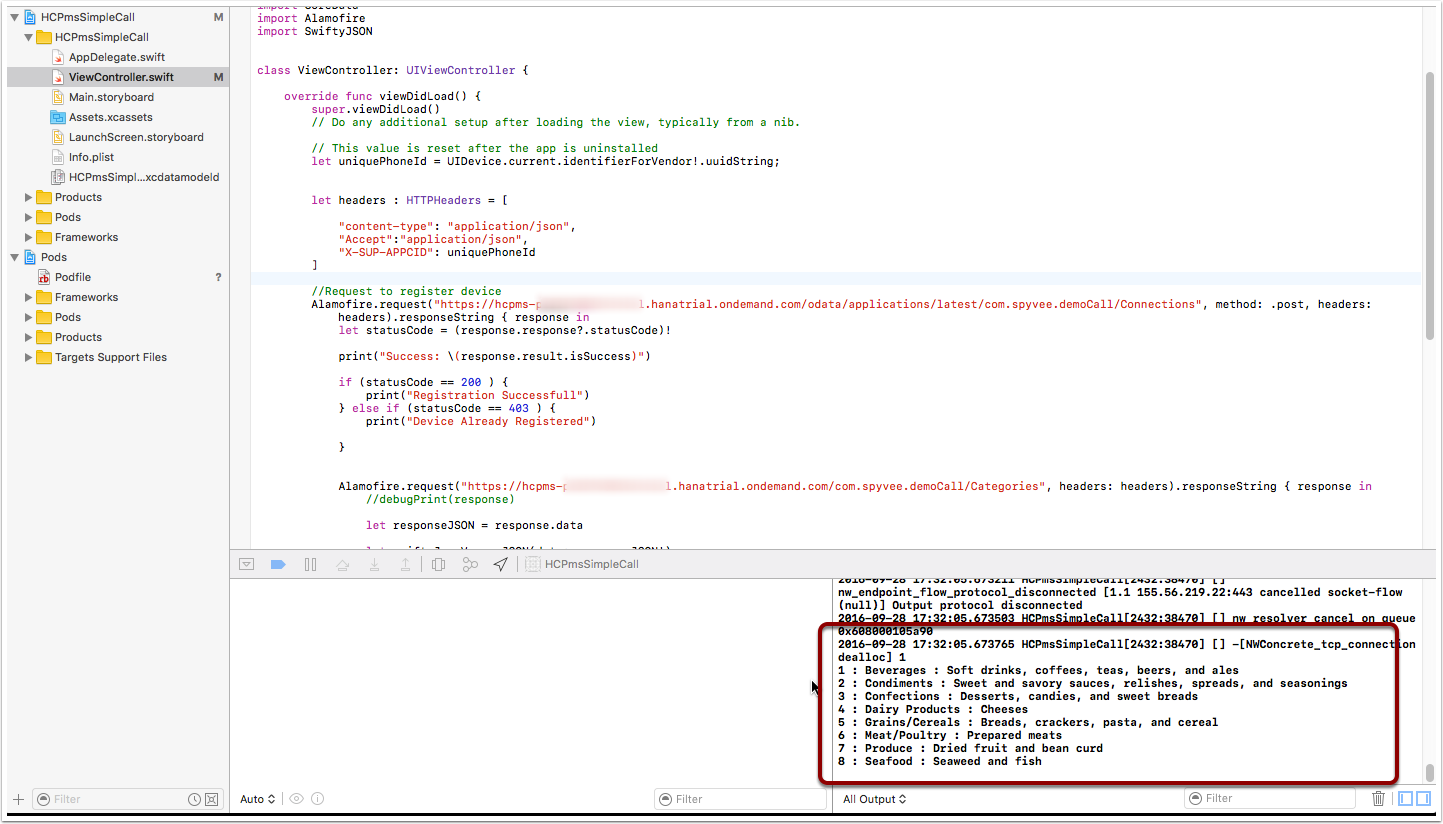
Out SWIFT app will call the services and then simply write the results within the Xcode console ( future tutorial to add UX coming soon )
Swift Development – Code Breakdown
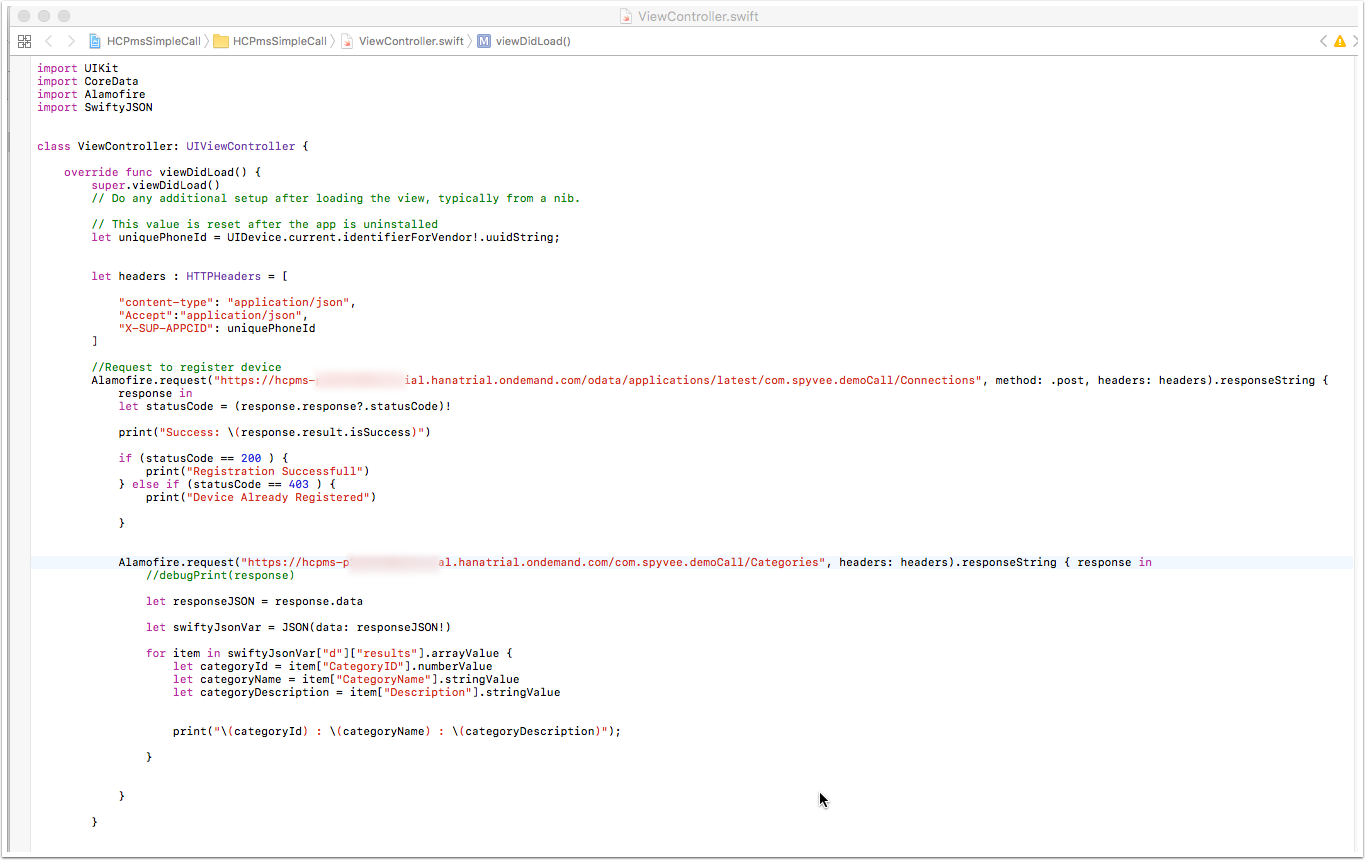
Lets look at the code:
- This call makes the initial request to the Connection service to register the device
if (statusCode == 200 ) {
print("Registration Successfull")
} else if (statusCode == 403 ) {
print("Device Already Registered")
}
- The response of the call is parsed. If a 403 status code is returned the device is already registered. If a 200 status code was returned the device was successfully registered
- The second call ( nested within the first call to make sure they are called in sequence ) calls the ODATA service to get the list of categories
let responseJSON = response.data
let swiftyJsonVar = JSON(data: responseJSON!)
for item in swiftyJsonVar["d"]["results"].arrayValue {
let categoryId = item["CategoryID"].numberValue
let categoryName = item["CategoryName"].stringValue
let categoryDescription = item["Description"].stringValue
print("\(categoryId) : \(categoryName) : \(categoryDescription)");
}
- We now use the JSON parsing functionality to loop through the multiple ‘Categories’ and display the CategoryID, Name, and Description within the Xcode console
Click here to download the complete code package
Stay tuned for Part 3 and learn how to enhance our application to display the content in a readable format.
If you have any questions feel free to reach out to us.
Contact